From WSO2 ESB 4.9.0 on-wards applying security for a proxy / service should be done via WSO2 Developer Studio. This post will be a simple guide on how to create a proxy and apply basic qos to it. I will be using User Name token authentication to apply qos.
Find the links below to download the latest releases of the two products.
- WSO2 ESB 4.9.0
- WSO2 Developer Studio 3.8.0
Step 1 Extract and run the two products
After you download the two products extract them to a preferred location. And start WSO2 ESB by navigating to <ESB_HOME>/bin and run wso2server.sh if you are on linux or wso2server.bat if your are on windows. Go to <DEVSTUDIO_HOME> and launch by double clicking eclipse icon.
Step 2 Create a registry project
Lets start first by creating a registry project - Open Developer studio dash board and select "Registry Resource" project
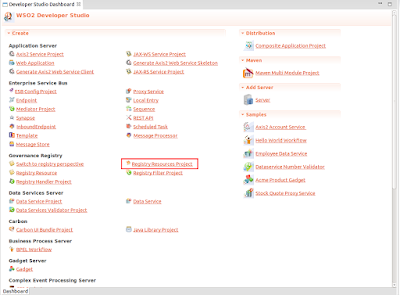 |
| Dev studio dashboard |
Now lets create a registry resource file. Right click on the project created then search for "Registry Resource" and click next and follow the below 3 steps to create the registry resource file.
 |
| Step 1 - Select registry resource |
 |
| Step 2 - Select From existing template |
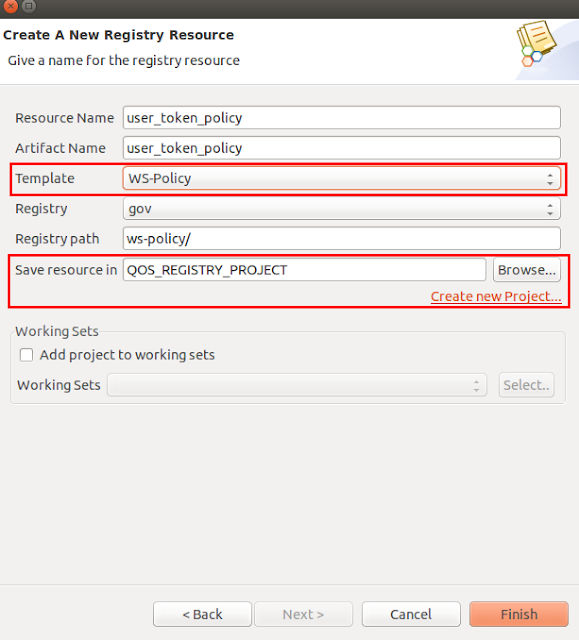 |
| Step 3 - Select Template and registry project |
Select the Template as WS - Policy and Select the registry project name ( by default it will be selected) and click on Finish.
Step 3 Select user token security policy and grant permission
Double click on the registry resource file that was created which will lead show the scenarios that are available as the below pic shows.
Select "UsernameToken" and click on "User Roles" and a window will be opened as below. Now point to the esb instance URL and provide user name and password as admin/admin. Now click on Get Roles. This will fetch all the user roles that is available in ESB. Lets select admin and click on ok.
Now click on the source view and the source will be shown as below. Note that the user role admin can be seen in the source. Refer below pic.
Step 4 Create the proxy project
Select "Proxy Service" project from the dev studio dashboard. In the window that popups provide any name for the proxy, leave the proxy type as Pass Through Proxy and click on "Create a new ESB project" and create a project. Finally provide the endpoint url for this I have used the default echo service that is been shipped in ESB.
After creating the proxy select and double click on the proxy file which resides in proxy- services(refer below pic)
Now in the graphical view select the proxy as the below picture shows.
Now set "Security Enabled" to true and click on Service policies which will open a window as shown in below pic where you can select the policy key
Browse to the eclipse project by selecting work-space.
Select the registry resource file from the works pace as shown in below pic and save the changes.
Click on source view then you will see that the security policy is been added.
Step 4 Create a Car file
To deploy the proxy and the registry file we need to bundle it in a Composite Application Project and then export it which will create a .car extension file which can be then uploaded to ESB. Lets see how it is done.
Select the Composite Application Project from dashboard and then select the two projects that were created. Refer below pic.
Remember to change the server role to Enterprise Service Bus in the registry project.
Now right click on the project created and click on "Export Composite Application Project" This will create the .car file.
Step 5 Deploy the project in WSO2 ESB
Now that we created the car file its just a matter of deploying it in ESB to secure the echo service. To do that go to ESB home and navigate to Carbon Applications section and browse to the car file created and upload the car file. If it is successfully deployed the ESB log will be as below.
[2015-10-18 12:04:52,063] INFO - ApplicationManager Deploying Carbon Application : QOS_Composite_Proj_1.0.0.car...
[2015-10-18 12:04:53,100] INFO - ProxyService Building Axis service for Proxy service : QOS_PROXY_PROJECT
[2015-10-18 12:04:53,111] INFO - ProxyService Adding service QOS_PROXY_PROJECT to the Axis2 configuration
[2015-10-18 12:04:53,112] INFO - DeploymentInterceptor Deploying Axis2 service: QOS_PROXY_PROJECT {super-tenant}
[2015-10-18 12:04:53,115] INFO - ProxyService WS-Security is enabled for service : QOS_PROXY_PROJECT
[2015-10-18 12:04:53,116] INFO - ProxyService Successfully created the Axis2 service for Proxy service : QOS_PROXY_PROJECT
[2015-10-18 12:04:53,116] INFO - ProxyServiceDeployer ProxyService named 'QOS_PROXY_PROJECT' has been deployed from file : /home/jasons/Products/ESB/QOS/wso2esb-4.9.0-RC4-SNAPSHOT/tmp/carbonapps/-1234/1445150092064QOS_Composite_Proj_1.0.0.car/QOS_PROXY_PROJECT_1.0.0/QOS_PROXY_PROJECT-1.0.0.xml
[2015-10-18 12:04:53,116] INFO - ApplicationManager Successfully Deployed Carbon Application : QOS_Composite_Proj_1.0.0 {super-tenant}
To verify whether the proxy is been secured go to Services -> List section verify that the secured symbol is available as shown in below pic.
Step 6 Test the service
Now lets verify that the service is secured. For this I will be using SOPA UI. Create a SOAP project and give the wsdl of the proxy created. Then copy the https endpoint and set it as the url. Set the user name and the password. Now invoke the web-service to echo a string and you will be able to see the result. Try it with false credentials and you will not be able to echo the message.


